This tutorial will focus on single-player mapping for the Half-Life 2 branch of Source, but the skills learned are applicable to any game, from Garry’s Mod to Portal 2. This guide will include changes to the way that the Source SDK is used, as a result of SteamPipe.
Getting Started
For your first experiments in level design, let’s jump right in to the editor and have a go. The Source SDK tools are no longer launched through Steam. Instead, find them by navigating to Steam\SteamApps\common, and then the folder for the game you want to map for. In this case select half-life 2, then select the bin folder. Among other things you will find several programs here which make up the various different tools that are a part of the SDK.
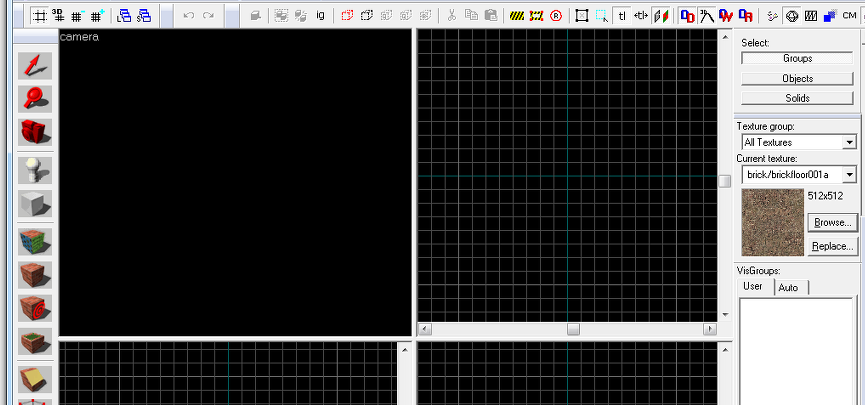
Let’s go ahead and launch hammer.exe. (Make a desktop shortcut to speed things up next time.) You may have heard of Hammer before, as this is the level editor for the Source engine, in which all maps are created. This is where you will spend the vast majority of your time making a map or mod. It may not look like much, but Hammer is a very powerful tool.
Start a new map by selecting File>New. You will see that the screen is divided into four. The top-left window is the 3D view, allowing you to move around your map as if using noclip in-game. The other three screens are 2D views; the top-right is an overhead view and the lower two are side views.
Basic Construction
Everything that makes up a level is either a brush or an entity. Brushes are the static geometry of the world, like walls, floors and buildings. Everything else, including items, weapons, enemies and models, is an entity. Let’s begin by making the floor of a room in your level out of a brush.
On the left-hand toolbar, select  Block Tool. To create your brush, click and drag on the top-right view. Notice that the box snaps to the grid, this will help make sure there are no unwanted gaps between brushes that could cause a problem later. Create a block which is 512×512 units. You can see it appear in the other two views.
To get a smaller grid, click the Smaller Grid  icon on the top toolbar. Use the side views to make the brush thinner (about 16 units will do) then hit the return key. To see your creation in the 3D view, mouse over it and press the Z key, which will allow you to use mouselook and the WASD keys to move around your level. You should see the block with the default texture on it, as shown at the right of the screen.
See Also: Hammer Tutorial: The Basics
Try repeating this process to create four walls your room. A normal wall has a height of 128 units and is usually about 8 or 16 units thick. (Most textures come in 128×128 sizes, so this is a good guide to get them to fit properly. The engine also prefers brush sizes to come in powers of two, but this isn’t a fixed rule.) Once you have done that, create a ceiling by selecting the floor of the room, and then shift-dragging it upwards on one of the side views to duplicate the brush.
At this point I should point out the first rule of using Hammer: save often! This program is notorious for crashing at the worst possible time and even the best of us have fallen victim to hours of lost work. Control+S is an invaluable tool. (For complex maps it is even worth saving separate backups of files in case something gets corrupted or lost to hard-drive failure.)

Make sure to save or risk losing this beautiful creation!
Redecorating
Move the 3D camera into the room to admire your handiwork. You can see that all the brushes look the same, probably like a brick wall. That is far from ideal, so take a look at the texture window on the right.

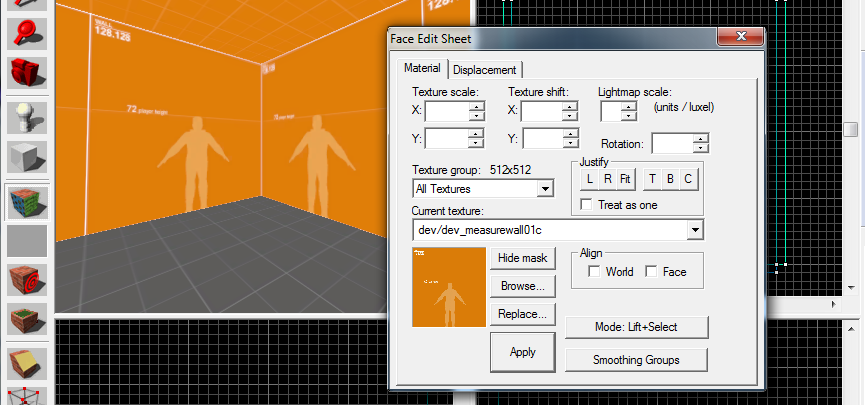
Hit Browse to open a window listing every texture in the game. You could select almost anything here, but when making early prototypes of their levels, many people choose to use the “measure” textures provided by Valve, which help you get an idea of the scale in your map and ensure that textures are lined up properly. Type “measure” into the Filter box, and select dev_measurewall1101c by double clicking. (This texture shows the outline of a player character on it.)

“Dev textures” make it easy to sketch out a level without having to worry about the details
You can see that this orange texture is now visible on the right-hand side of the screen. To apply it to your existing walls, hold control and select all of them, then click  Apply Current Texture from the left-hand toolbar.
If you want to apply a texture to just one face of a brush, hit  Toggle Texture Application to open a small window. Now select the floor of your room in the 3D view and choose Browse here to select another texture and apply it. Using the 3D camera you should see that only one side of the block has had its texture altered. This window is also useful in allowing you to align and rotate textures.
This is also the place to come to make natural terrain, known as displacements
Each of these “textures” you have applied corresponds to a material in game, so a metal texture will automatically make metallic sounds when walked on or shot at for instance.
Try out some other textures available and adjust some of these settings before moving on.
Entities
Creating static walls is great, but to have any interactivity your map is going to need entities. Entities come in two types, brush entities (made from the same blocks you’ve been using) and point entities. For now let’s stick to the latter.
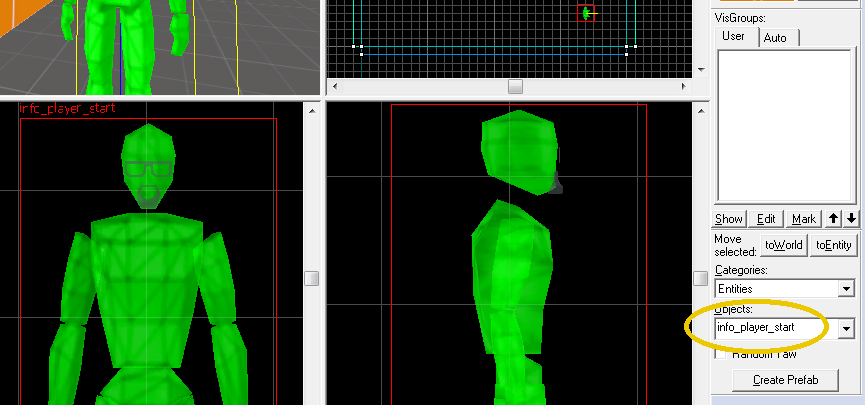
Click on the  icon labelled Entity Tool. On the right of the screen are two drop-down boxes. The second one includes a huge list of entities that can be placed in the map. Scrolling through you can see enemies such as npc_zombie, items such as weapon_rpg and special effects such as env_spark, amongst many others. Resist the temptation to start playing with them all and find info_player_start. This entity will represent the player’s spawn point when they first start the map. Click somewhere in the 3D view and you will place a green Freeman character. (This entity is also a handy reference for sizes in your map.) Like brushes, you can move entities around on the 2D view screens. (But unlike brushes, they cannot be re-sized.) Rotate an entity by clicking it once it is already selected to change the handles into circles.
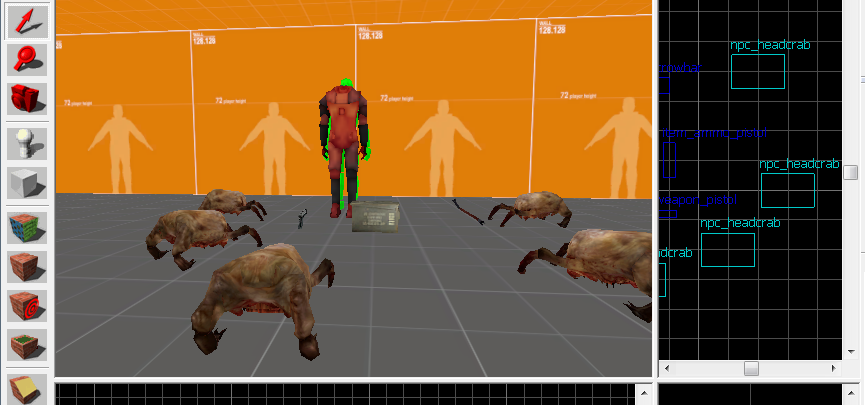
Not exactly next-gen graphics…
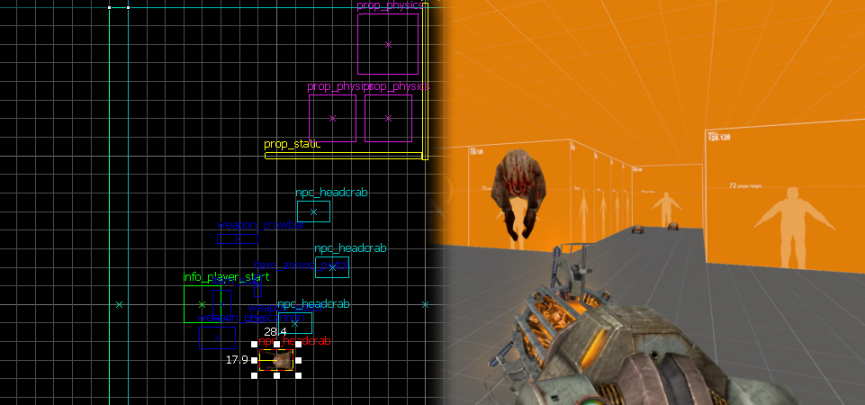
So we now have a way for the player to arrive in your virtual world. To help them along, place an item_suit and weapon_crowbar nearby. It is just as easy to place any item or weapon; try adding some item_healthkits or other weapons and ammo around your level. Let’s add some challenge by placing a couple of npc_headcrabs in the level, but far enough away so they don’t take you by surprise! (This is a very basic NPC and there is much more to making NPCs behave intelligently, but at this stage just placing them in the map is fine.)
You can extend the layout of the map with corridors and other rooms at this point, if you want to make it more playable.
Mod of the Year 2014
I’m sure that even with weapons and enemies included, your level is still looking rather sparse. In Valve maps, most complex details are represented by props, the premade models that you can drop into your levels. There are three main types of props: prop_static, for objects that never move or interact; prop_physics, for objects that can be picked up or moved by the gravity gun; and prop_dynamic, for objects that can be attached to other objects, be animated and do other fancy things.
We’ll start simple; place a prop_static entity somewhere in your map. You will see it appears as a small cube and we will have to assign it a model. Open the entity’s properties by double-clicking it in the 3D view or right-clicking and selecting Properties on the 2D view. This is the menu which will give you the ability to change various options on all entities, including inputs and outputs which control the functions of entities and are needed for any scripted events.
For now though, let’s just go to the World Model field and hit Browse. Here are all the models included with the game. Like the texture browser, this window allows you to filter by name. For example, searching “foliage” gives the various trees and plants that can be used for outdoor environments. Try searching some different keywords to find a prop that suits your room. Clicking the info tab should let you know what type of prop is supported (physics, static or dynamic). Once you’ve got a prop you like, use the 2D views to position it properly.
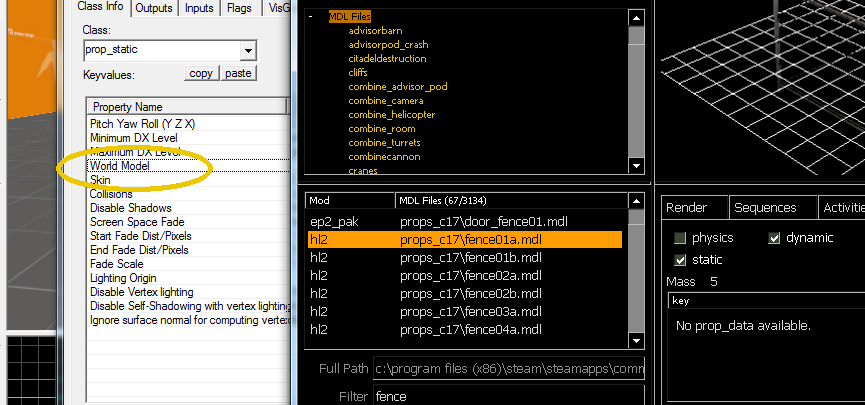
I’m sure this window used to be green..
You can repeat this process with prop_physics; try adding some oil drums to be thrown around with the gravity gun. (Hint: In Hammer the Gravity Gun entity is weapon_physcannon.) Make sure you move them so they don’t intersect any brushes.
Compiling
At this point, it is possible to run your map in game (of course, I wouldn’t recommend you release it like this!). Compiling is the process by which your map is converted into a .bsp file which the game can run, and visibility and lighting are computed in advance so that they do not have to be done as you play.
Before we go and compile the level, we should check the level for “leaks”. A leak is any way by which it is possible to reach the “void” outside the map from any of the entities inside it. There are some methods for finding leaks, but in a small map like this they should be easy to spot. The map can still be run with leaks, but it will cause many undesirable effects.
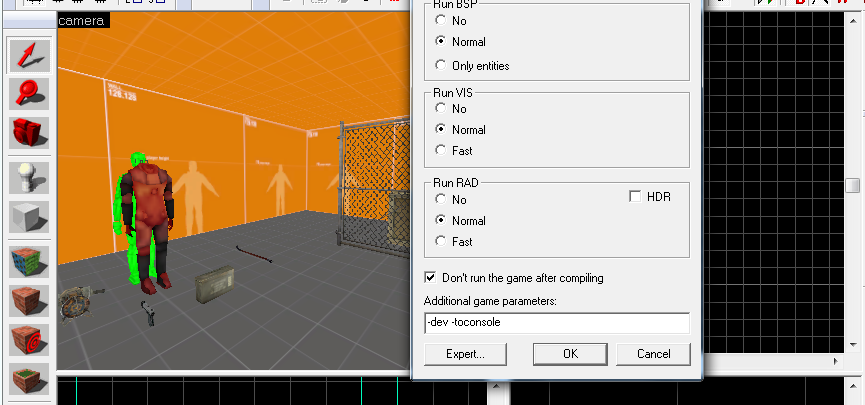
These settings will make sense when you learn how maps work in Source
If you are happy with your map, go to File>Run Map…. You will be prompted to save if you haven’t already, then given several options. Leave all the radio buttons on their default settings and make sure Don’t run the game after compiling is unchecked. In the Additional game parameters, add “-dev -toconsole” without quotes. This just gives some more information on screen whilst the game is running, and enables cheats automatically. Now click OK, and wait a few seconds. You will see lots of information about the compile process, and hopefully an instance of the game will launch quickly.
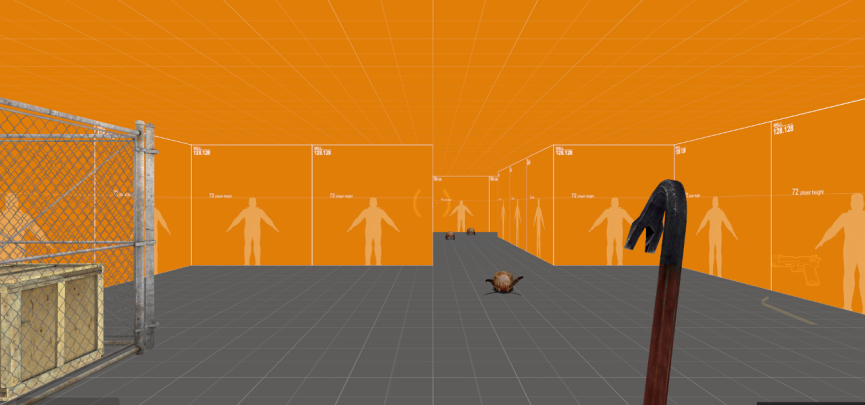
Hooray! You are now inside your level, where you can run around, get weapons and kill headcrabs. You may notice some problems though, most obviously the fact that everything is “fullbright”. The map is running in this way because we haven’t placed any light source entities. This is something we can learn about another time.
A level design masterpiece!
Ready to learn more? The Valve Developer Wiki is a great place to learn more about the ins and outs of the engine. Be sure to look out for more tutorials on LambdaGeneration soon!
More Source Mapping Tutorials
Hammer Tutorial: The Basics – By RedBadger
Make Your Map Glow with Cubemaps and HDR – By Dooglz
Beginners’ Guide to Triggers, Inputs and Outputs in Source – By MisterAddy
A Guide to Lighting in Source (Part One) – By MisterAddy
A Guide to Lighting in Source (Part Two) – By MisterAddy

Maybe I wasn’t clear.
It’s certainly possible to carve a displacement, there’s no argument there.
I just strongly suggest against it, because either hammer or one of valve’s tools will have issues with it. While it may not be every time, you will end up getting hammer to crash/hang, or otherwise spit an error out where continuing gives bad geometry (and the map will no longer compile due to that).
Generally the carve tool isn’t the way to go. Sure it’s faster, but with my experience, it’s better to start off optimized, then have to go back in and sort things out. The vertex tool along with painting the geometry I find works much better.
Don’t worry, you’re definitely right. Using the carve tool for anything like that is a terrible idea. As a mapping newbie I fell into that trap more than once. I am pretty sure the video that Alex posted is intended as a joke.
Ah yes, the classic box room to start mapping.
I’ll say that backups and planning are 2 very important things.
Backing up allows you to roll back your map, which is critical when doing “advanced” brush work. Oh and don’t try to carve a displacement.
Planning prevents horrible brush work which can lead to poor performance.
You have to start somewhere!
I agree with you on all those points. I may have to write an article about planning at a later date. Even someone like me who’s not very artistic can benefit greatly from doing some rough pencil sketches before they go anywhere near the editor.
Try telling that to this guy http://youtu.be/xh9Kr2iO4XI
I’m not sure whether to laugh or cry…