
If you followed our first Source SDK tutorial, you should have gotten to grips with the basic features of Hammer: you can use brushes to create rooms and corridors, change textures and place props. Your level is still mostly lifeless though, so it’s time to use Triggers to make things happen.
Beginners’ Guide to Triggers, Inputs and Outputs in Source
Modding & Development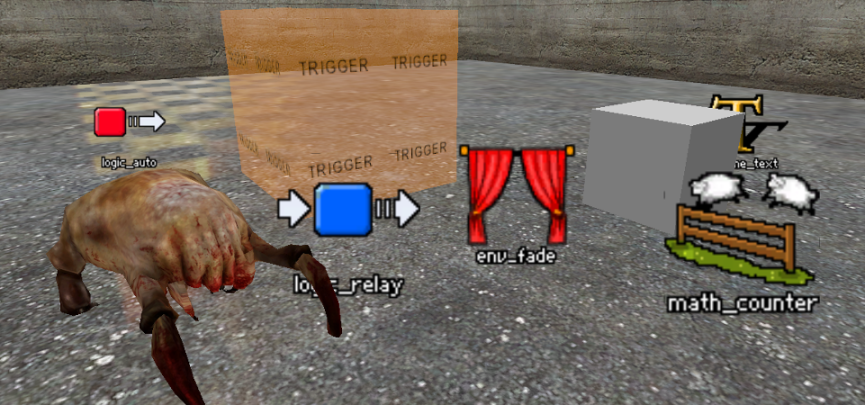
Triggers are special, invisible brush entities that are “triggered” when a player or other entity touches them, causing an effect or sending an output to another entity. We are going to start by creating the most basic type of trigger, a trigger_once. To start with you will need a basic room and corridor; you can use the map created in the previous tutorial if needed.
Creating a Trigger
Next to the currently displayed texture, click Browse… and in the filter type “tools”. These are a range of special materials used for various effects. Most are pretty self-explanatory. Select the toolstrigger material. Now use the ![]() Block Tool to create a brush with this material that covers the entrance to the corridor. At the moment this block is just a static object that has no effect. To give it a function we have to tie it to an entity. The easiest way to do this is to select the brush with the
Block Tool to create a brush with this material that covers the entrance to the corridor. At the moment this block is just a static object that has no effect. To give it a function we have to tie it to an entity. The easiest way to do this is to select the brush with the ![]() Selection Tool and press Control+T, or right-click on it in the 2D view and select Tie To Entity.
Selection Tool and press Control+T, or right-click on it in the 2D view and select Tie To Entity.
The Object Properties window will open. The default “brush entity” that your brush has been converted to is a func_detail, a very useful entity that is used for making smaller details in your maps that don’t affect visibility. Anyway, we don’t need to worry about this right now. From the Class drop-down box, choose trigger_once and press Apply.
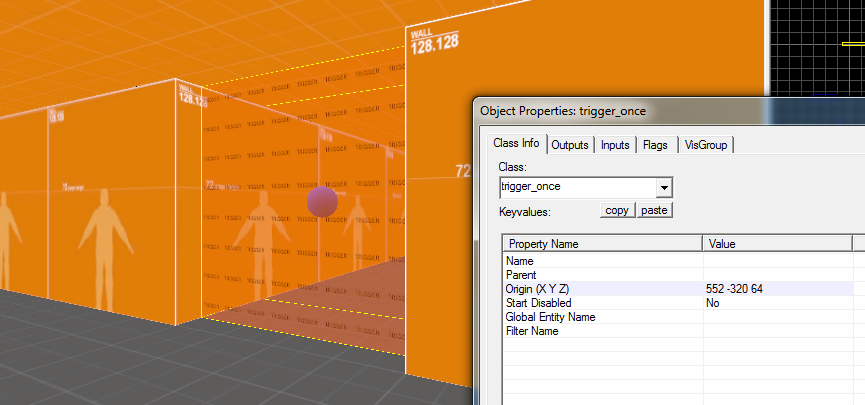
Let’s take a look at this window’s tabs in some more detail. This first tab, Class Info, gives some basic settings for the entity. It is often a good idea to give entities a name, as this is how other entities can refer to them, but for this example one is not needed. The Filter Name is a clever way of restricting what entities cause the trigger to be set off. For instance, imagine a puzzle in which the player has to find a specific physics object like a cog or battery; a trigger could be used to detect only props with a specific name. Moving on to the next couple of tabs we find Outputs and Inputs. Right now these are empty but we will come back here later to make the trigger do something. The Flags tab includes more options for the entity.
Now we need something for the trigger to do. For demonstration purposes, we are going to make a sound play as the player walks down the corridor. The entity for playing a sound in Source is ambient_generic, so create one of those now. The position of the entity in the map is where the sound will come from. Open the Object Properties for this entity by double-clicking in the 3D view. Give the entity a Name here, something relevant like “corridor_sound” is usually helpful. Select the Sound Name field and Browse… to find a sound. Again you can use the Filter to narrow the selection. Be aware that some sound files are designed to loop automatically. We shouldn’t need to worry about any of the other options here, but taking a look at the Flags tab can reveal some other useful settings.
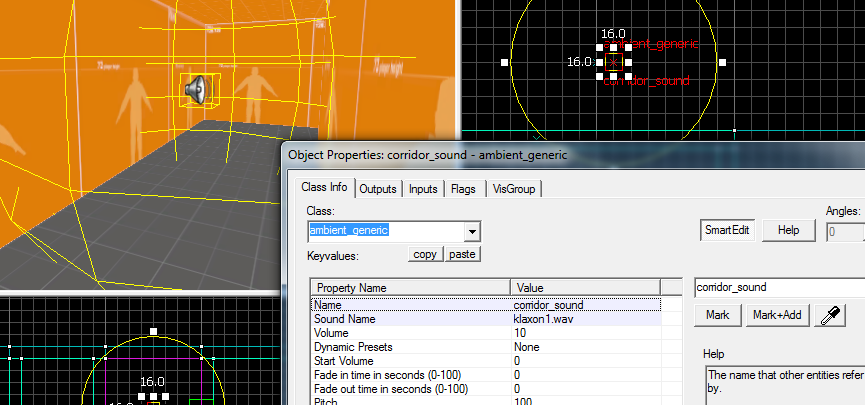
The sphere around this entity represents the area in which the sound is audible.
Inputs and Outputs
All we have to do now is connect the trigger to the sound. Go back to the trigger_once’s Outputs tab and press Add… . There are quite a few fields to fill out but don’t be intimidated as they are all quite self-explanatory. The first one is what you want to cause an output, in this case “OnTrigger”. The Target entity is the one that we want to be affected, in this case our “corridor_sound”. Hit the drop-down for Via this input to see all the different things that the target entity can do. We want it to “PlaySound”. The Parameter override will be greyed out because there are no other options that we need to set. If you want you can also add a delay between the trigger being activated and its effect happening. Press Apply and that’s it! You can go to the Inputs tab on the ambient_generic entity and see the input from your trigger entity. If you compile the map you should find that as you walk down the corridor your desired sound can be heard.

One entity can have many different inputs and outputs.
This is the same principle used to make almost any complex event happen in Source levels. They are all controlled by a combination of entities with triggers and outputs. Logic_ and math_ entities can be used to go further, creating relays of events, timers, counters and more. Every entity in Source is controlled with Inputs and Outputs.
Other Examples
Automatic door
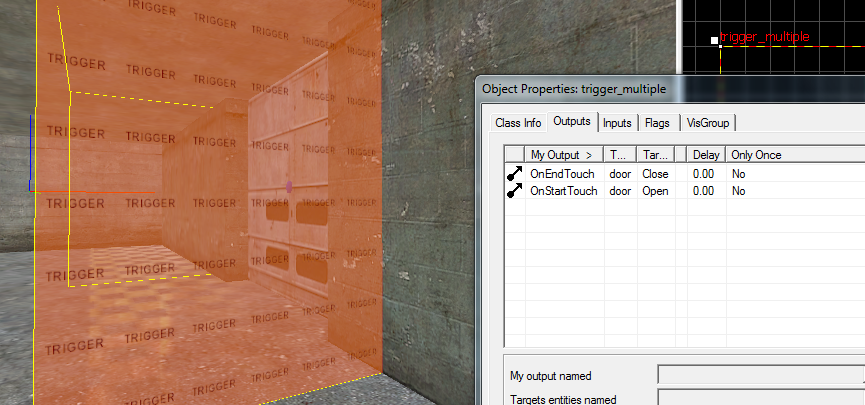
In this example a func_door brush entity is controlled by a trigger_multiple. Each time the player touches the trigger, the door opens. When the player leaves the trigger, the output OnEndTouch is fired so the door closes.
End of game
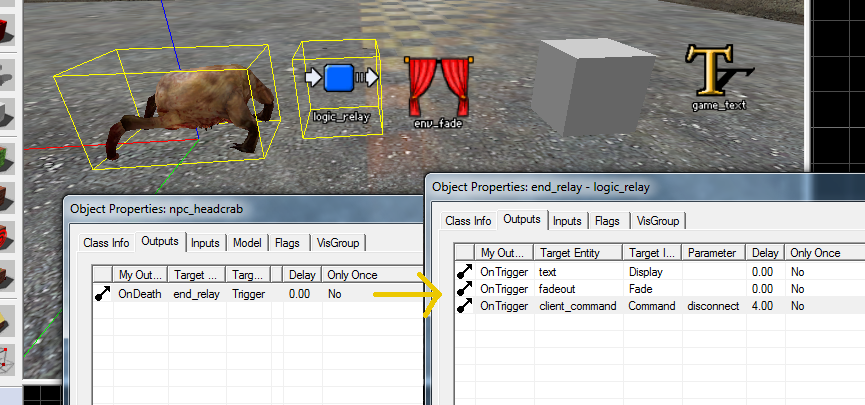
This is a simple method of creating a proper ending to a map. When you win the “boss fight” (killing the headcrab) its death triggers a logic_relay, an entity that is able to control many outputs. This in turn sends an output to an env_fade entity which fades the screen to black. It also triggers a game_text which displays a victory message. Finally, after a delay the point_clientcommand entity is triggered. This is an entity that is able to activate console commands, in this case the “disconnect” command, which will return the player to the main menu.
More Source Mapping Tutorials
Hammer Tutorial: The Basics – By RedBadger
No Comments
No comments to display.